Web Dev Course:
Astro Framework

Introduction
- Astro is a JavaScript frontend-only framework to create fast and simple static websites.
- It’s HTML-first, optimized for content-heavy pages, and supports various front-end JavaScript libraries or framework (React, Vue, Svelte…).
Getting Started
- Install Nodejs
0.1. Visual Studio Code Emmet
You can use regular Emmet Abbreviations in Visual Studio Code with Astro to speed up your coding! Most standard HTML abbreviations work fine, but some, like the ! shortcut for an HTML boilerplate, won’t work as expected. Instead, use html:5 for a basic HTML5 structure.
HTML Emmet Abbreviations
- Angle Bracket (
>): Nests elements (think “inside”). - Asterisk (
*): Repeats elements. - Plus (
+): Adds sibling elements (think “next to”). - Dot (
.class): Adds a class to an element. - Hash (
#id): Adds an ID to an element.
Here are some practical examples of Emmet abbreviations in Astro files:
<!--Emmet: ul>li*2 -->
<ul>
    <li></li>
    <li></li>
</ul>

<!-- Emmet: div#hero>p*3.side -->
<div class="hero">
    <p class="side"></p>
    <p class="side"></p>
    <p class="side"></p>
</div>
SCSS Emmet Abbreviations
Emmet also works in <style> blocks or .css/.scss files, although they might be less practical:
- Margin Bottom (
mb:): Sets margin-bottom (mb:aforauto). - Position (
p:): Sets position (p:rforrelative). - Width (
w:): Sets width (w:100pfor100%). - Background Color (
bgc:): Sets background color (e.g.,bgc:#fff). - Display (
d:): Sets display (e.g.,d:fforflex).
Here are some practical examples of Emmet abbreviations in Astro <style> blocks or .scss files:
/* Emmet: mb:a */
margin-bottom: auto;

/* Emmet: w:100p+d:f */
width: 100%;
display: flex;
0.3. Astro Terminal Commands 📟
This is a list of most useful Terminal commands in Visual Studio Code, far beyond what we already listed to create a project!
| Command | Description |
|---|---|
npm create astro@latest |
Creates a new Astro project in interactive mode |
npx @astrojs/upgrade |
Upgrades an existing project to the latest Astro version |
npm start |
Starts local dev server at localhost:4321 |
npm run dev |
By default, same as npm start. Customizable in package.json |
npm run build |
Builds the Astro project; output saved in 📁 dist & overwritten each time |
npm run build --verbose |
Builds the project with more detailed logs |
npm run preview |
Previews the production build locally (the 📁 dist version) |
npm run astro check |
Checks your project for errors |
npm run astro ... |
Help to see every command |
Note: npm create astro@latest project-name -- --template minimal can be used to creates a new Astro project with the name specified (replace project-name) and a minimal template.
Adding integrations
Astro’s ecosystem is more powerful with integrations, such as the following:
You can easily add them by using the astro add command, like this:
npx astro add mdx
npx astro add react
npx astro add sass
npx install tailwindcss @tailwindcss/vite
1. Project Organization
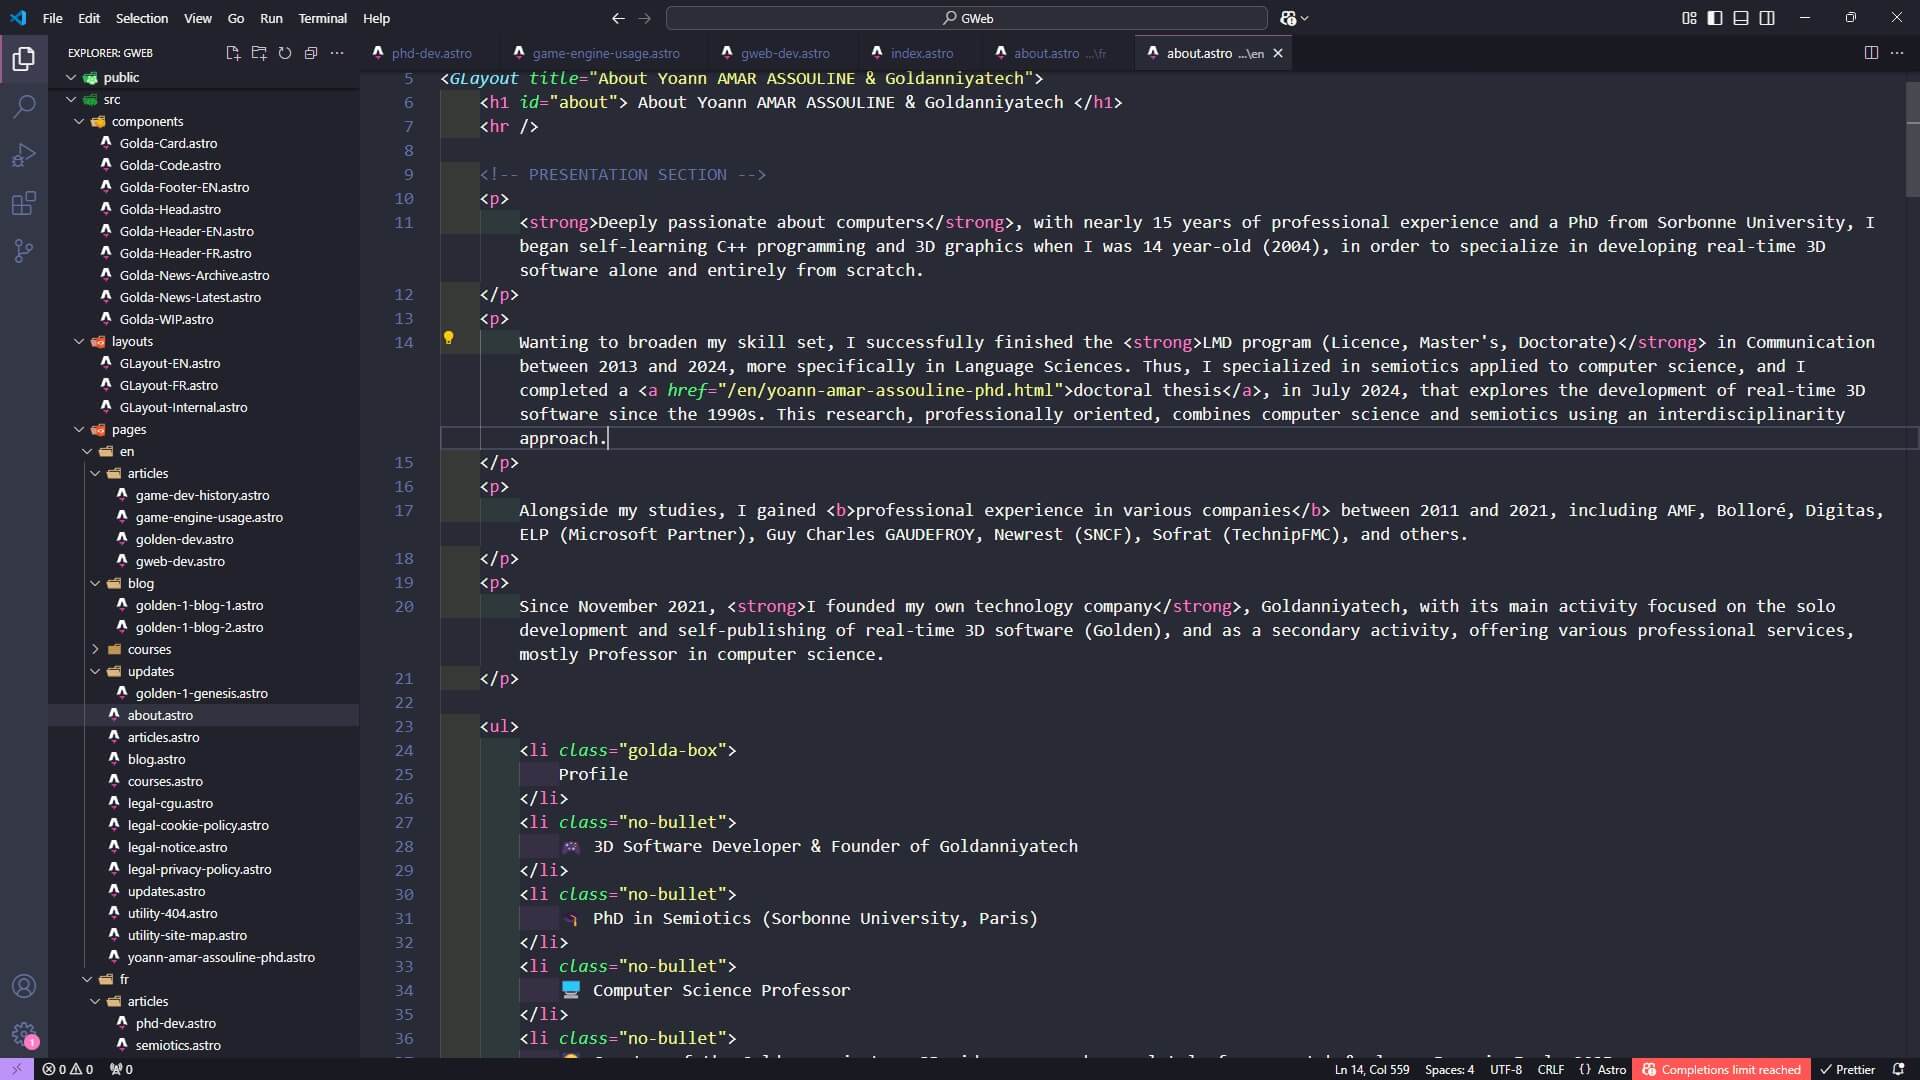
Astro projects only require the 📁 src/pages folder as a mandatory directory, while everything else is conventional. I strongly recommend following a convention with your folder organization, such as the one below. I also shared a screenshot of my own GWeb project (i.e., this website) on this page as a real-world use case 😉!
1.1. Conventions 💾
Astro has a few naming conventions to keep your project tidy and predictable:
- PascalCase for components and layouts file names.
- Examples:
WebsiteHeader.astro•CarSiteLayout.astro
- Examples:
- kebab-case for web pages inside the
src/pagesfolder.- Examples:
video-game-controllers.astro•blog-post-2024-12.mdx
- Examples:
1.2. Recommended Project Structure 🗃️
Here’s how to organize your Astro project, which should follow Astro folders conventions.
- 📁 dist: Build version of the website, generated by Astro using the
npm run buildcommand.- 📁 _astro: Generated and minified CSS files. These should be replaced in each build.
- 📁 public: Folder for assets (images, fonts, favicon, etc.) that won’t be processed (i.e., optimized or modified) by Astro.
- 📁 Assets
- 🌐 favicon
- 📄 robots.txt
- 📁 src: Contains the source code for your application.
- 📁 components: Reusable UI elements that can be utilized across different pages and layouts.
- 📁 interactions: TypeScript (or JavaScript) files to manage user interactions.
- 📁 layouts: Templates to define the overall structure and design of pages, including headers and footers.
- 📁 pages: Individual pages, representing the main content of the website.
- 📄 index.astro: Required homepage for most hosting services. Please use lowercase and ensure no mistakes with “index”! You can also use HTML files (.html, .htm), but it’s not recommended.
- 📁 styles: SCSS (or CSS) files for styling documents.
- 📄 astro.config.mjs: Astro configuration file for customizing project settings.
- 📄 package.json: Project metadata and dependencies (ensure scripts like
devandbuildexist).
2. Creating Content in Astro
Astro’s biggest advantage is its use of .astro files (instead of .html), which are structured in two parts: the Component Frontmatter and the Component Template.
The Component Frontmatter is defined by triple-dash (---) code fences for importing files (layout, components, stylesheets…) and adding TypeScript logic.
---
import "../styles/Website.scss"; // Importing a stylesheet
import Gallery from "../components/Gallery.astro"; // Importing a component

const title = "My Astro Website";
---
The Component Template is the actual content of your page, component, or layout. It’s very similar to standard HTML code, but with embedded components and dynamic data in TypeScript.
<Gallery />
<h1> {title} </h1>
<p>
    Welcome to my Astro website!
</p>
2.1. Astro Special Tags 🏷️
Astro provides several special tags that help to have more control over content, components, and performance optimization with Astro projects.
Slot
The most important is probably the <slot> tag, which allows you to project content from one component or layout into another, like a placeholder where you can instert content from a parent. This is very useful for creating layouts and templates.
You can also use the <slot name="example"> attribute to define multiple distinct content areas within a component or layout.
<slot /> <!-- Default slot -->
<slot name="example" /> <!-- Named slot -->
2.2. Astro Page Overview 📃
Here’s a simple Astro page (inside 📁 pages) to get you started. It showcases frontmatter imports and basic HTML, great for understanding the Astro framework.
However, as it’s pretty basic, you will want to refactor it (improve the code without changing the content) by organizing your code with a layout and components for better maintainability and reusability.
I want to focus on the <style> and the <script> tags, though, with Astro-specific settings.
---
import "../styles/PageStyle.scss"; // Requires 'astro add sass'
const pageTitle = "My Custom Astro Page";
---
<!DOCTYPE html>
<html lang="en">
<head>
<meta charset="UTF-8">
<meta name="viewport" content="width=device-width, initial-scale=1.0">
<title>{pageTitle}</title>
</head>
<body>
<header>
<h1>Welcome to {pageTitle} 🌟</h1>
<nav>
<ul>
<li><a href="/">Home</a></li>
<li><a href="/about">About</a></li>
</ul>
</nav>
</header>
<main>
<h2>Game Overview</h2>
<p>
Dive into the ultimate Open World, crafted with <strong>passion</strong>!
</p>
</main>
<footer>
<p>© 2025 My Astro Website</p>
</footer>
</body>
</html>
<!-- CSS (or SCSS) can go here -->
<style>
</style>
<!-- JavaScript (or TypeScript) can go here -->
<script>
</script>Style Tag
Properties inside a <style> tag are scoped by default, meaning they only apply to a specific page or component where it’s used. Astro will generate an attribute selector when it’s scoped.
<style>
    img {
        border: 1px solid red;
    }
</style>

// this will become img[data-astro-cid-mqlskdfj] after build.
However, you can use the is:global attribute to prevent Astro from adding an attribute selector. It will leave the CSS as-is.
<style is:global>
    img.covers#main-cover {
        border: 1px solid red;
    }
</style>
Besides, you can also use SCSS, although you need to install the scss integration with npx astro add sass.
<style lang="scss">

</style>
2.3. Astro Layout Template
For creating pages more efficiently, it’s essential to use layouts, which are templates for a basic page structure that will be displayed on every page. This is one of the key benefits of frameworks like Astro.
I personally prefer using components for the head, header, and footer sections of my layout. However, it’s up to you and depends on the complexity of these sections.
You can also use <style> tags in Astro files, but I strongly recommend keeping your CSS or SCSS stylesheet separated from your layout for easier maintenance and a more efficient workflow. Remember the Separation of Concerns (SoC) design principle 😉!
---
interface Props {
    title?: string;
}

let {
    title = "Restaurant Website",
} = Astro.props;

import '../styles/Main.scss';
import WebHead from '../components/WebsiteHead.astro';
import WebHeader from '../components/WebsiteHeader.astro';
import WebFooter from '../components/WebsiteFooter.astro';
---

<!doctype html>
<html lang="en">
    <WebHead title={title} />
    <body>
        <WebHeader />
        <main>
            <slot />
        </main>
        <slot name="after-main" />
        <WebFooter/>
    </body>
</html>

<style lang="scss">
    html {
        background: navy;
    }
</style>
2.4. Astro Page with Layout
This second page helps to demonstrate a page with a layout, which is very often the way to use Astro.
---
// Astro Component Frontmatter
import WebsiteLayout from "../../../layouts/WebsiteLayout.astro";
import DailySpecial from '../../../components/DailySpecial.astro';
import "../styles/Daily-Special.scss";
const title = "Restaurant Homepage";
---

<!-- Astro Component Template -->
<WebsiteLayout>
    <!-- Content of your page goes here, inside the layout 😉! -->
    <h1> {title} </h1>
    <p>
        Hello and welcome to our homepage!
    </p>
    <DailySpecial />

</WebsiteLayout>
3. Next Steps & Resources 🚀
You’re off to a great start! Now, you can take your knowledge further and start building amazing projects:
- Astro Docs: Dive deeper into components, islands, and and powerful APIs to level up your projects.
- GitHub: Explore the source code, contribute to the community, or check out the latest updates.
I hope you will build a great blog, portfolio, or professional website. The possibilities are truly endless! Best of luck with your Astro journey 😎!